今回はjupyter notebookをdocker上で動かす方法を紹介します。
※注:この記事ではjupyter notebookのコンテナイメージをそのまま使いますが、DockerHub上このコンテナイメージにはOfficialマークが付いていません。Officialマークの有無を気にする必要がある場合は、Officialマークのついたコンテナイメージ(例えばpython)の上にjupyter notebookをインストールする方がベターかと思われます。
以下のDockerfileとdocker-compose.ymlを用意します。
FROM jupyter/base-notebook:latestversion: '3'
services:
jupyter:
build: .
ports:
- "8888:8888"
volumes:
- ./work:/home/jovyan/workコマンドを実行します。
# ファイル一覧(workフォルダはソースコード格納用に予めて作成しておく)
$ ls -l
total 12
-rw-rw-r-- 1 xxx xxx   35 Feb 28 15:19 Dockerfile
-rw-rw-r-- 1 xxx xxx  125 Feb 26 15:40 docker-compose.yml
drwxrwxrwx 3 xxx xxx 4096 Feb 28 15:19 work

# コンテナをビルド
$ sudo docker-compose build
Building with native build. Learn about native build in Compose here: https://docs.docker.com/go/compose-native-build/
Building jupyter
Sending build context to Docker daemon   7.68kB

Step 1/1 : FROM jupyter/base-notebook:latest
latest: Pulling from jupyter/base-notebook
Digest: sha256:26df7877462e32cdbb9cbcf3411e26444efcdbb1aaa0c8b11032e3c296e6a5be
Status: Downloaded newer image for jupyter/base-notebook:latest
 ---> 2f65fe843a85
Successfully built 2f65fe843a85
Successfully tagged jupyter_jupyter:latest

# コンテナを起動
$ sudo docker-compose up -d
Building with native build. Learn about native build in Compose here: https://docs.docker.com/go/compose-native-build/
Recreating jupyter_jupyter_1 ... done

# コンテナの状態を確認
$ sudo docker-compose ps
      Name                    Command              State           Ports
---------------------------------------------------------------------------------
jupyter_jupyter_1   tini -g -- start-notebook.sh   Up      0.0.0.0:8888->8888/tcp

# コンテナのログを確認(JupyterNotebookの接続に必要なトークンを確認)
$ sudo docker-compose logs
Attaching to jupyter_jupyter_1
jupyter_1  | WARN: Jupyter Notebook deprecation notice https://github.com/jupyter/docker-stacks#jupyter-notebook-deprecation-notice.
jupyter_1  | Executing the command: jupyter notebook
jupyter_1  | [I 15:20:50.076 NotebookApp] Writing notebook server cookie secret to /home/jovyan/.local/share/jupyter/runtime/notebook_cookie_secret
jupyter_1  | [W 2021-02-28 15:20:51.284 LabApp] 'ip' has moved from NotebookApp to ServerApp. This config will be passed to ServerApp. Be sure to update your config before our next release.
jupyter_1  | [W 2021-02-28 15:20:51.285 LabApp] 'port' has moved from NotebookApp to ServerApp. This config will be passed to ServerApp. Be sure to update your config before our next release.
jupyter_1  | [W 2021-02-28 15:20:51.285 LabApp] 'port' has moved from NotebookApp to ServerApp. This config will be passed to ServerApp. Be sure to update your config before our next release.
jupyter_1  | [W 2021-02-28 15:20:51.285 LabApp] 'port' has moved from NotebookApp to ServerApp. This config will be passed to ServerApp. Be sure to update your config before our next release.
jupyter_1  | [I 2021-02-28 15:20:51.296 LabApp] JupyterLab extension loaded from /opt/conda/lib/python3.8/site-packages/jupyterlab
jupyter_1  | [I 2021-02-28 15:20:51.296 LabApp] JupyterLab application directory is /opt/conda/share/jupyter/lab
jupyter_1  | [I 15:20:51.302 NotebookApp] Serving notebooks from local directory: /home/jovyan
jupyter_1  | [I 15:20:51.302 NotebookApp] Jupyter Notebook 6.2.0 is running at:
jupyter_1  | [I 15:20:51.302 NotebookApp] http://717c3cb9b081:8888/?token=xyzxyzxyz
jupyter_1  | [I 15:20:51.302 NotebookApp]  or http://127.0.0.1:8888/?token=xyzxyzxyz
jupyter_1  | [I 15:20:51.303 NotebookApp] Use Control-C to stop this server and shut down all kernels (twice to skip confirmation).
jupyter_1  | [C 15:20:51.307 NotebookApp]
jupyter_1  |
jupyter_1  |     To access the notebook, open this file in a browser:
jupyter_1  |         file:///home/jovyan/.local/share/jupyter/runtime/nbserver-6-open.html
jupyter_1  |     Or copy and paste one of these URLs:
jupyter_1  |         http://xxx:8888/?token=xyzxyzxyz
jupyter_1  |      or http://127.0.0.1:8888/?token=xyzxyzxyz
sshポートフォワーディングをして、http://localhost:8888にアクセスすると、Jupyter Notebookに接続できました!
しかし、次の画面を見るとわかる通り、機械学習で使う基本的なライブラリすらインストールされていません。。。
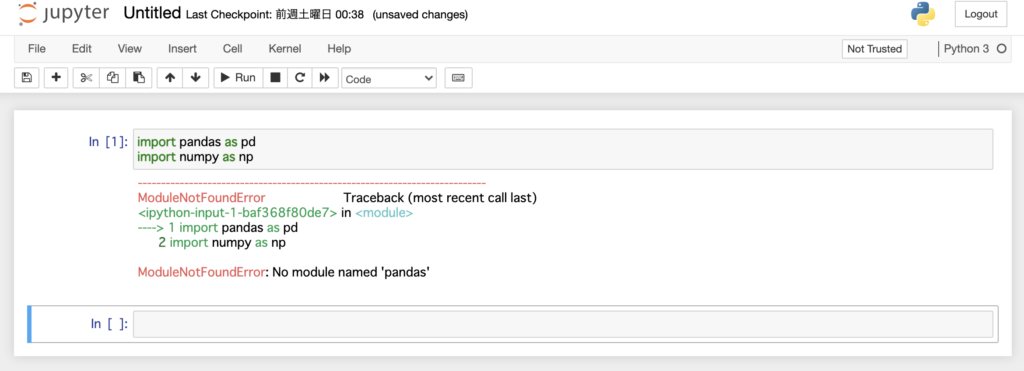
というわけで、Dockerfileに1行だけ追加し、
FROM jupyter/base-notebook:latest

RUN pip install numpy pandas
再度コマンドを実行します。
# コンテナをビルド(numpy、pandasがインストールされている)
$ sudo docker-compose build
Building with native build. Learn about native build in Compose here: https://docs.docker.com/go/compose-native-build/
Building jupyter
Sending build context to Docker daemon   7.68kB

Step 1/2 : FROM jupyter/base-notebook:latest
 ---> 2f65fe843a85
Step 2/2 : RUN pip install numpy pandas
 ---> Running in 23c04c5e582b
Collecting numpy
  Downloading numpy-1.20.1-cp38-cp38-manylinux2010_x86_64.whl (15.4 MB)
Collecting pandas
  Downloading pandas-1.2.2-cp38-cp38-manylinux1_x86_64.whl (9.7 MB)
Requirement already satisfied: python-dateutil>=2.7.3 in /opt/conda/lib/python3.8/site-packages (from pandas) (2.8.1)
Requirement already satisfied: pytz>=2017.3 in /opt/conda/lib/python3.8/site-packages (from pandas) (2021.1)
Requirement already satisfied: six>=1.5 in /opt/conda/lib/python3.8/site-packages (from python-dateutil>=2.7.3->pandas) (1.15.0)
Installing collected packages: numpy, pandas
Successfully installed numpy-1.20.1 pandas-1.2.2
Removing intermediate container 23c04c5e582b
 ---> 738e0cffd5ca
Successfully built 738e0cffd5ca
Successfully tagged jupyter_jupyter:latest

# ここから先の作業は前の手順と同じ
すると、ライブラリが無事インストールされました!
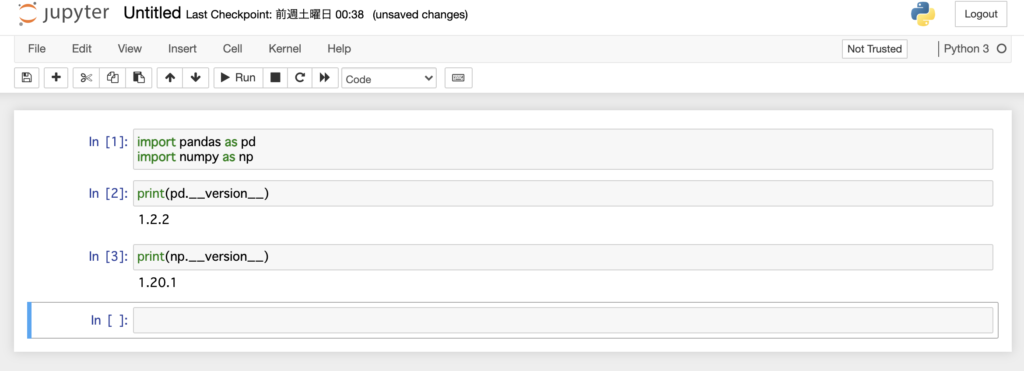
このような感じで、自分が必要なライブラリを都度Dockerfileでインストールするようにしていけば、自分好みのJupyter Notebookが簡単に出来上がります!]
ちなみにR言語を使いたい場合はDockerfileのイメージの指定をjupyter/r-notebookにすれば良いです。
機械学習ではGPUを使いたいケースが多いですが、今回紹介した手順ではGPUは使えませんので、次回はGPUを使うケースの手順を紹介したいと思います。